บทความ

กำลังแสดงโพสต์จาก กันยายน, 2018

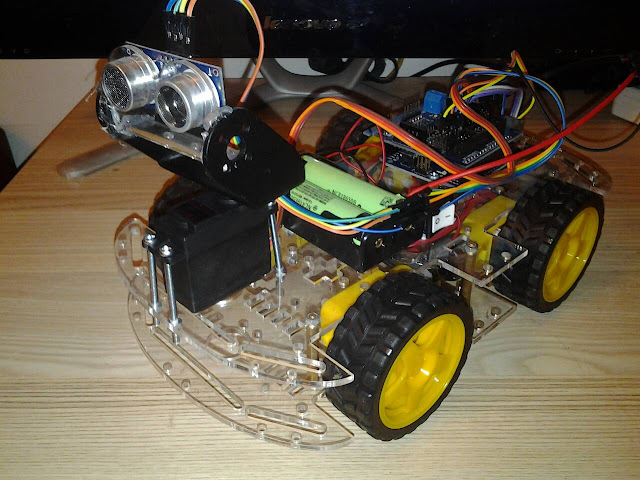
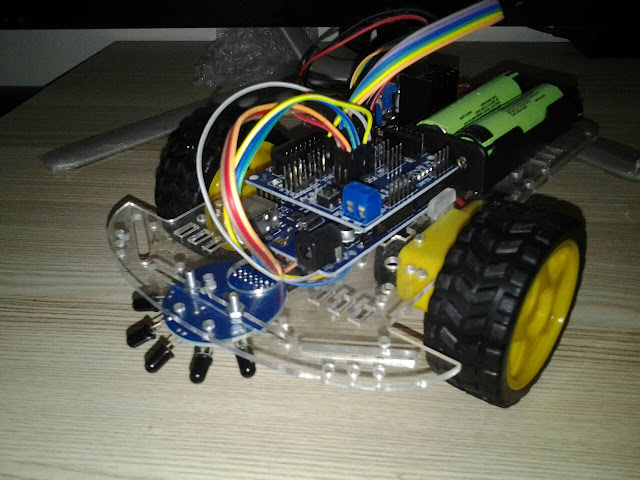
งานแก้ไข แยก อธิบายส่วนต่างๆของproject

รูปภาพ
HARDWARE 1.Arduino uno r3 2.bluetooth hc 06 3.2N2222 4.1N4007 5.relay 6.load INPUT 1.bluetooth hc 06 MCU 1.Arduino uno r3 OUTPUT 1.relay 2.load SOFTWARE #include <SoftwareSerial.h>                         เรียกใช้Library bluetooth const int rxPin = 4;                                         Rx PIN ใช้ขา4 const int txPin = 2;                                         TX PIN ใช้ขา2 SoftwareSerial mySerial(rxPin, txPin);         กำหนดค่าลงใน Library bluetooth const int Loads[] = {9, 10, 11, 12};              กำหนด ตัวแปร อาเรย์ int state = 0;                                                  ตัวแปร state = 0 int flag = 0;                                                   ตัวแปร flag = 0 void setup()  {    for (int i=0;i<4;i++)                                  ถ้า INT เท่ากับ0และน้อยกว่า4 ให้ i+ไปเรื่อยๆ     {       pinMode(Loads[i], OUTPUT);              กำหนดให้ Load โดยเกบค่าตัวแปรอาเรย์ i เป็น OUTPUT       }    mySerial.be

งานที่ 20 หุ่นยนต์ติดตามวัตถุ Ultrasonic

รูปภาพ
HARDWARE SOFTWARE #include <Servo.h> #include <NewPing.h> // Motor A pins (enableA = enable motor, pinA1 = forward, pinA2 = backward) int enableA = 3; int pinA1 = 6; int pinA2 = 7; //Motor B pins (enabledB = enable motor, pinB2 = forward, pinB2 = backward) int enableB = 5; int pinB1 = 8; int pinB2 = 9; #define TRIGGER_PIN  A0 // Arduino pin tied to trigger pin on the ultrasonic sensor. #define ECHO_PIN     A1  // Arduino pin tied to echo pin on the ultrasonic sensor. #define MAX_DISTANCE 25 // Maximum distance we want to ping for (in centimeters). Maximum sensor distance is rated at 400-500cm. NewPing sonar(TRIGGER_PIN, ECHO_PIN, MAX_DISTANCE); // NewPing setup of pins and maximum distance. Servo myservo;  // create servo object to control a servo // a maximum of eight servo objects can be created int pos = 23; int distance = 0; int stepsize = 5; int detect = 0; void setup() {   Serial.begin(115200); // Open serial monitor at 115200 baud to see ping results.   pinMod

งานที่ 19 หุ่นยนต์เดินตาม เปลวไฟ Fire Extinguisher

รูปภาพ
HARDWARE SOFTWARE // Motor A pins (enableA = enable motor, pinA1 = forward, pinA2 = backward) int enableA = 3; int pinA1 = 6; int pinA2 = 7;   //Motor B pins (enabledB = enable motor, pinB2 = forward, pinB2 = backward) int enableB = 5; int pinB1 = 8; int pinB2 = 9;   int sensor[5] = {0, 0, 0, 0, 0};   void setup() {   pinMode(enableA, OUTPUT);   pinMode(pinA1, OUTPUT);   pinMode(pinA2, OUTPUT);     pinMode(enableB, OUTPUT);   pinMode(pinB1, OUTPUT);   pinMode(pinB2, OUTPUT);     enableMotors();   analogWrite(enableA, 120);  // ปรับค่าความเร็วของหุ่นยนต์   analogWrite(enableB, 120);  // ปรับค่าความเร็วของหุ่นยนต์     delay(2000);   }   void loop() {         sensor[0] = analogRead(A1);   sensor[1] = analogRead(A2);   sensor[2] = analogRead(A3);   sensor[3] = analogRead(A4);   sensor[4] = analogRead(A5);     if ((sensor[0] > sensor[1]) && (sensor[0] > sensor[2]) && (sensor[0] &