บทความ

กำลังแสดงโพสต์จาก สิงหาคม, 2018

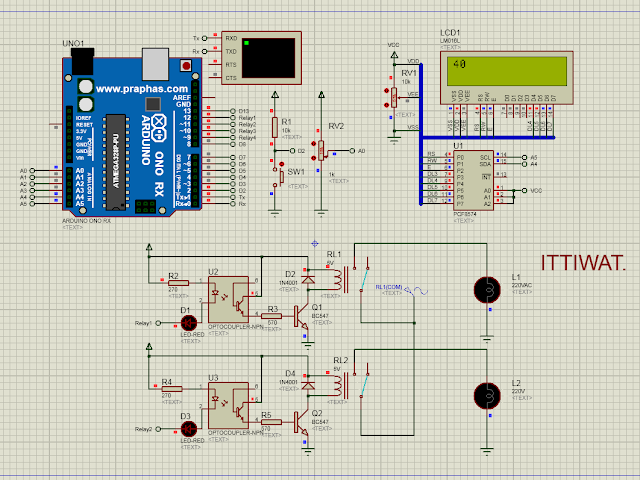
งาน ปฎิบัติ 18 SMART FARM
รูปภาพ
HARDWARE SOFTWARE #include <SoftwareSerial.h> #include <DHT.h> //============================================= #include <Wire.h>  #include <LiquidCrystal_I2C.h> //LiquidCrystal_I2C lcd(0x27, 16, 2); LiquidCrystal_I2C lcd(0x3F, 16, 2); SoftwareSerial ArduinoSerial(3, 2); // RX, TX //============================================= int SW_ON = 4,SW_OFF = 5,pin=6;//กำหนดขา INPUT  int Sun = 9,CSun = 0,Relay1 = 12, Relay2 = 11; //กำหนดขา OUTPUT    int ATL = A0,ATH = A1;//กำหนดขา Analog int VTL1 = 0,VTH1 = 0,TL = 0,TH =0,VRHL = 50,VRHH = 80;  DHT11 dht11(pin); //=============================================  void setup() {   lcd.begin();   Serial.begin(115200);   ArduinoSerial.begin(4800);   while (!Serial){     ;     }   //=====================================================    lcd.setCursor(0, 0);lcd.print("Elec Pattayatech");   lcd.setCursor(0, 1);lcd.print("Smart Farm 2016 ");   delay(5

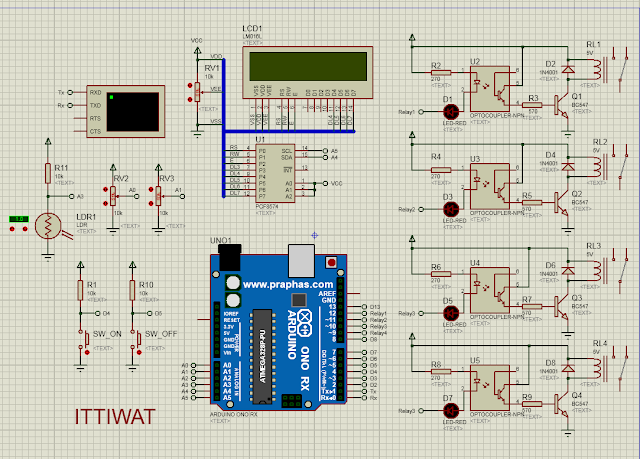
งาน ปฎิบัติ 17 ควบคุมเครื่องใช้ไฟฟ้าขนาดใหญ่ด้วยรีเลย์

รูปภาพ
HARDWARE SOFTWARE #include <LiquidCrystal_I2C.h>  LiquidCrystal_I2C lcd(0x27,16,2); int aVal=0,tempaVal=0; const int SW_ON = 2;  const int led_ON =  13; int CSW_ON = 0; int C_CSW_ON =0; int Relay1=12,Relay2=11,Relay3=10,Relay4=9; int sensorPin = A0; int sensorValue = 0; void setup() {   lcd.backlight();   lcd.begin(16,2);   Serial.begin(9600);   pinMode(led_ON, OUTPUT);pinMode(SW_ON, INPUT);   pinMode(Relay1,OUTPUT);pinMode(Relay2,OUTPUT);   pinMode(Relay3,OUTPUT);pinMode(Relay4,OUTPUT); //   digitalWrite(Relay1,HIGH);digitalWrite(Relay2,HIGH);   digitalWrite(Relay3,HIGH);digitalWrite(Relay4,HIGH);   lcd.setCursor(0,0);   lcd.print("Project2017");   lcd.setCursor(0,1);   lcd.print("standby"); } //END Setup void loop() {   CSW_ON = digitalRead(SW_ON);   sensorValue = analogRead(sensorPin);//Serial.println(sensorValue);   //=======================================================================   i

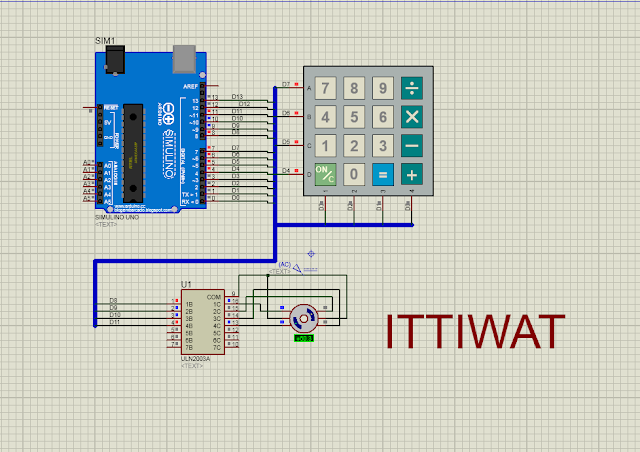
งาน ปฎิบัติ 16 การใช้งาน มอเตอร์

รูปภาพ
HARDWARE 1 SOFTWARE 2 #include <Stepper.h> #include "Keypad.h" #define STEP_ANGLE_4STEP 32 //360/11.25 degree #define STEP_OUT_WITH_GEAR 2048 //32*64 Stepper stepper(STEP_ANGLE_4STEP,8,10,9,11); char keys[4][4]={   {'7','8','9','A'},   {'4','5','6','B'},   {'1','2','3','C'},   {'*','0','#','D'}}; byte rowPins[] = {7,6,5,4}; byte colPins[] = {3,2,1,0}; int speedmotor = 400; int dirmotor = 1; Keypad keypad = Keypad(makeKeymap(keys),rowPins,colPins,4,4); void setup()  { } void loop()  {   char key = keypad.getKey();   if (key != NO_KEY)   {         if (key == '1')             speedmotor = 400;         if (key == '2')             speedmotor = 700;         if (key == '3')             speedmotor = 1000;           if (key == 'A')             dirmotor =

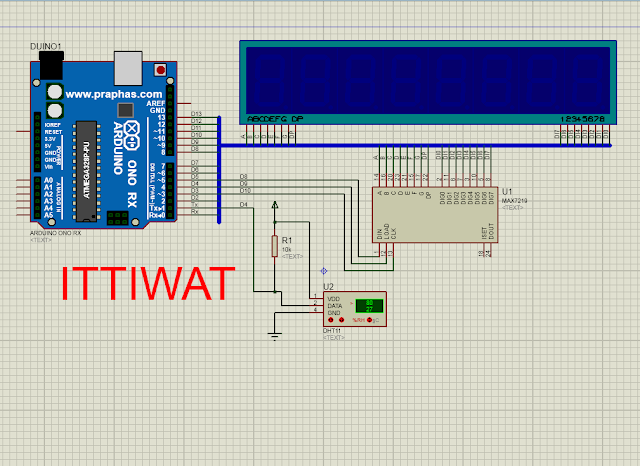
งาน ปฎิบัติ 15 อ่านค่าอุณหภูมิ ด้วย DTH11

รูปภาพ
  HARDWARE SOFTWARE #include <LedControl.h> #include <DHT11.h> int pin=4; DHT11 dht11(pin); LedControl lc=LedControl(8,10,9,1);  // Pin 8->DIN, 10->CLK, 9->CS(LOAD), 1 = No.of devices void show2digit(int h,int t) {   int seg1,seg2,seg3,seg4;   seg1 = h%10;   seg2 = h/10;   lc.setDigit(0,4,seg1,false);    lc.setDigit(0,5,seg2,false);   seg3 = t%10;   seg4 = t/10;   lc.setDigit(0,0,seg3,false);    lc.setDigit(0,1,seg4,false);   delay(300); } void setup() {   Serial.begin(9600);   while (!Serial) {       ; // wait for serial port to connect. Needed for Leonardo only     }   lc.shutdown(0,false);     lc.setIntensity(0,5);    lc.clearDisplay(0); } void loop() {   int err;   float temp, humi;   if((err=dht11.read(humi, temp))==0)   {     Serial.print("temperature:");     Serial.print(temp);     Serial.print(" humidity:");     Serial.print(humi);     Serial.println()

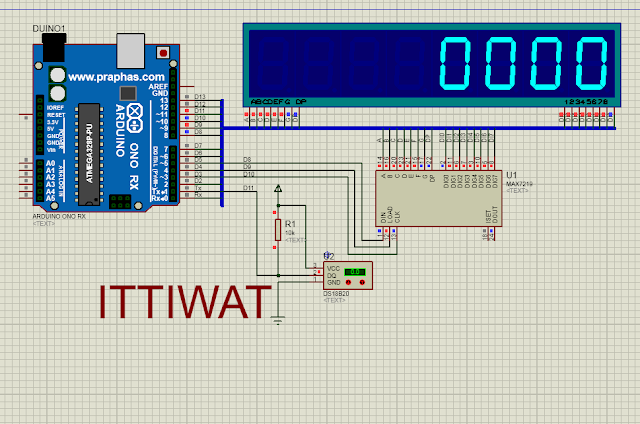
งาน ปฎิบัติ 14 อ่านค่าอุณหภูมิ

รูปภาพ
HARDWARE SOFTWARE #include <LedControl.h> #include <OneWire.h> #include <DallasTemperature.h> #define ONE_WIRE_BUS 11 OneWire oneWire(ONE_WIRE_BUS); DallasTemperature sensors(&oneWire); float Tfloat; long Tint; LedControl lc=LedControl(8,10,9,1);  // Pin 8->DIN, 10->CLK, 9->CS(LOAD), 1 = No.of devices void show6digit(long num) {   int seg1,seg2,seg3,seg4,seg5,seg6;   seg6 = (num/100000);   seg5 = ((num%100000)/10000);   seg4 = (((num%100000)%10000)/1000);   seg3 = ((((num%100000)%10000)%1000)/100);   seg2 = (((((num%100000)%10000)%1000)%100)/10);   seg1 = (((((num%100000)%10000)%1000)%100)%10);   lc.setDigit(0,0,seg1,false);    lc.setDigit(0,1,seg2,false);    lc.setDigit(0,2,seg3,false);    lc.setDigit(0,3,seg4,false);    lc.setDigit(0,4,seg5,true);    if (num>=100000)       lc.setDigit(0,5,seg6,false);   delay(300); } void setup(void) {   sensors.begin();   lc.shutdown(0,false);  

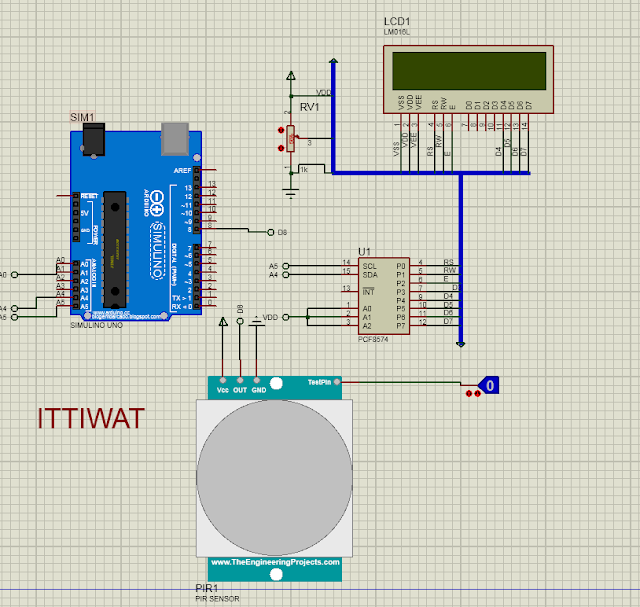
งานปฎิบัติ 13 PIC SENSOR

รูปภาพ
HARDWARE SOFTWARE #include <LiquidCrystal_I2C.h> LiquidCrystal_I2C lcd(0x27,16,2); int PIRpin = 8; void setup()  {    lcd.begin(16,2);   pinMode(PIRpin,INPUT);   lcd.home();   lcd.print("Waiting for PIR");   delay(10000);          lcd.clear(); } void loop() {    int x = digitalRead(PIRpin);   lcd.home();   lcd.print("PIR = ");   lcd.print(x);   delay(100); }

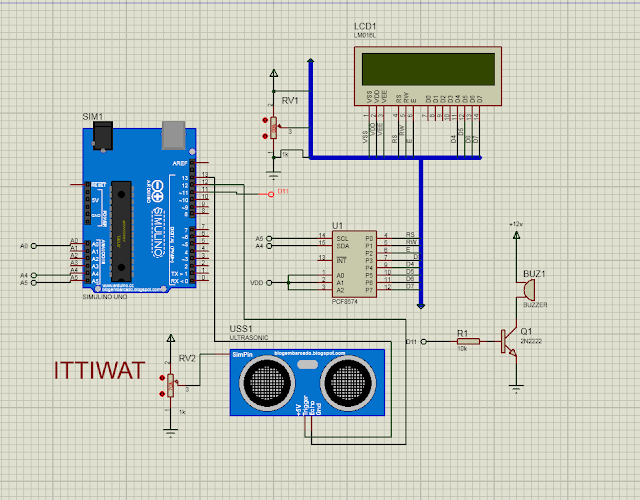
งาน ปฎิบัติ 12 ultrasonic

รูปภาพ
HARDWARE SOFTWARE CODE1 #include <LiquidCrystal_I2C.h> LiquidCrystal_I2C lcd(0x27,16,2); int triggerPin = 13; int echoPin = 12; long duration,distCM,temp_distCM=0; void setup()  {   lcd.begin(16,2);   lcd.setCursor(0,0);   lcd.print("Dist =      cm");   pinMode(triggerPin,OUTPUT);   pinMode(echoPin,INPUT); } void loop()  {   digitalWrite(triggerPin,LOW);   delayMicroseconds(2);   digitalWrite(triggerPin,HIGH);   delayMicroseconds(10);   digitalWrite(triggerPin,LOW);   duration = pulseIn(echoPin,HIGH);   distCM = duration/58;   if (temp_distCM != distCM)   {     lcd.setCursor(7,0);     lcd.print("    ");   }   lcd.setCursor(7,0);   lcd.print(distCM);   temp_distCM = distCM;   delay(300); } CODE2 #include <LiquidCrystal_I2C.h> LiquidCrystal_I2C lcd(0x27,16,2); int triggerPin = 13; int echoPin = 12; long duration,distCM; void setup()  {   lcd.begin(16,2);   pinMode(tri

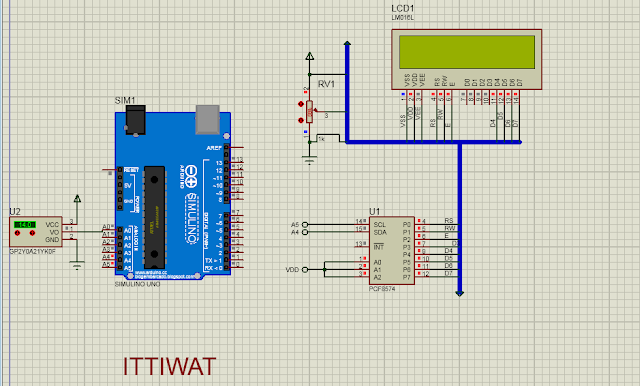
งาน ปฎิบัติ 11 เชื่อมต่อโมดูลแส้ง อินฟาเรต

รูปภาพ
HARDWARE SOFTWARE #include <LiquidCrystal_I2C.h> LiquidCrystal_I2C lcd(0x27,16,2); int aval,temp_aval=0; void setup()  {   lcd.begin(16,2);   lcd.setCursor(0,0);   lcd.print("aval = "); } void loop()  {    aval = analogRead(A0);    if (temp_aval != aval)    {       lcd.setCursor(7,0);       lcd.print("    ");    }    lcd.setCursor(7,0);    lcd.print(aval);    if (aval>400)    {       lcd.setCursor(0,1);       lcd.print("Hi_Pattayatech");     }    else    {       lcd.setCursor(0,1);       lcd.print("-----");     }    temp_aval = aval;    delay(300); }

งาน ปฎิบัติ 10 LDR แสดงผลด้วย LCD

รูปภาพ
HARDWARE SOFTWARE #include <LiquidCrystal_I2C.h>  LiquidCrystal_I2C lcd(0x3F,16,2); int aVal=0,tempaVal=0; void setup() {   lcd.begin(16,2); } void loop()  {   aVal = analogRead(A0);   if (tempaVal != aVal)   {     lcd.clear();     lcd.setCursor(0,0);     lcd.print(aVal);     lcd.setCursor(0,1);     if (aVal<100)       lcd.print("Dark");     else       lcd.print("Light");     delay(300);   }   tempaVal = aVal; }

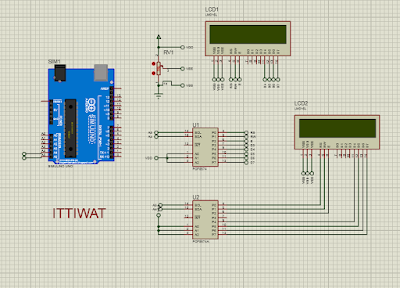
งาน ปฎิบัติ 9 งานรับค่า INPUT ต่างๆ แสดงผลทาง LCD

รูปภาพ
HARDWARE SOFTWARE #include <LiquidCrystal_I2C.h> LiquidCrystal_I2C lcd(0x27,16,2); void setup() {  lcd.begin (16,2); } void loop() {  lcd.home();  lcd.print ("ECS");  for (int i=0;i<13;i++)  {   delay (400);   lcd.scrollDisplayRight ();  }  for (int i=0;i<13;i++);  {   delay (400);   lcd.scrollDisplayLeft ();  } }

mini project วัดความกดอากาศและความสูงแสดงผลทางจอLCD

รูปภาพ
Arduino Barometer Project Using BMP180   Nikodem Bartnik   Arduino Projects Pressure sensors are widely used in drones, weather stations, smartphones and more. It is important to know how this small piece of technology works. We are going to be using the BPM180 sensor. The name of the module is GY-68. The small device can read, pressure, altitude, and temperature. Let’s build a small device that uses BPM180 to read pressure and altitude and uses an I2C LCD display to show that information (You can as well choose to display it on the serial port). Here are the components we need: 1 x Arduino Uno Board 1 x BMP180 pressure sensor 1 x I2C LCD Jumpers wires As usual, we need to do the connection before uploading the sketch into the board. Because both the LCD and the pressure sensor use the I2C, we have to connect the pins SDA and SCL to the analog pins 4 and 5. Some barometers have a Vin pin and some a 3V3 pin. If yours has a Vin, it should be connected to 5V